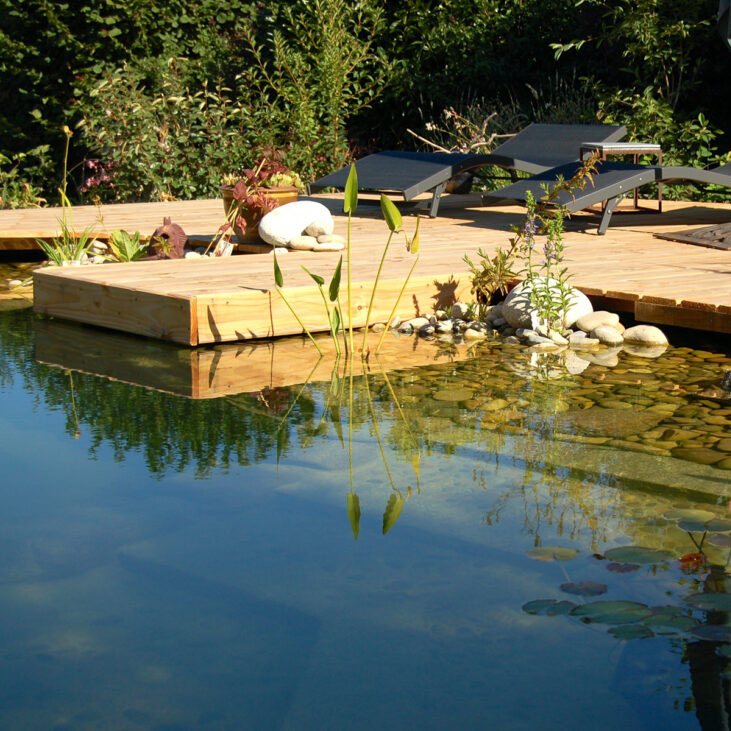
Natural swimming pools provide an enticing opportunity for a revitalising and cool swim, while enhancing the appeal of your garden by replacing the artificial, bright blue appearance of a conventional chlorinated pool with a more untamed and organic ambiance.
Chemical Free Natural Swimming Pools
Experience a refreshing water retreat without the need for chemical additives by creating picturesque natural swimming pools in your own backyard.
While conventional swimming pool construction involves an array of manufactured materials and chemical treatments, a growing number of homeowners and builders have discovered the art of constructing pools that harmonize with nature and seamlessly blend into the landscape.
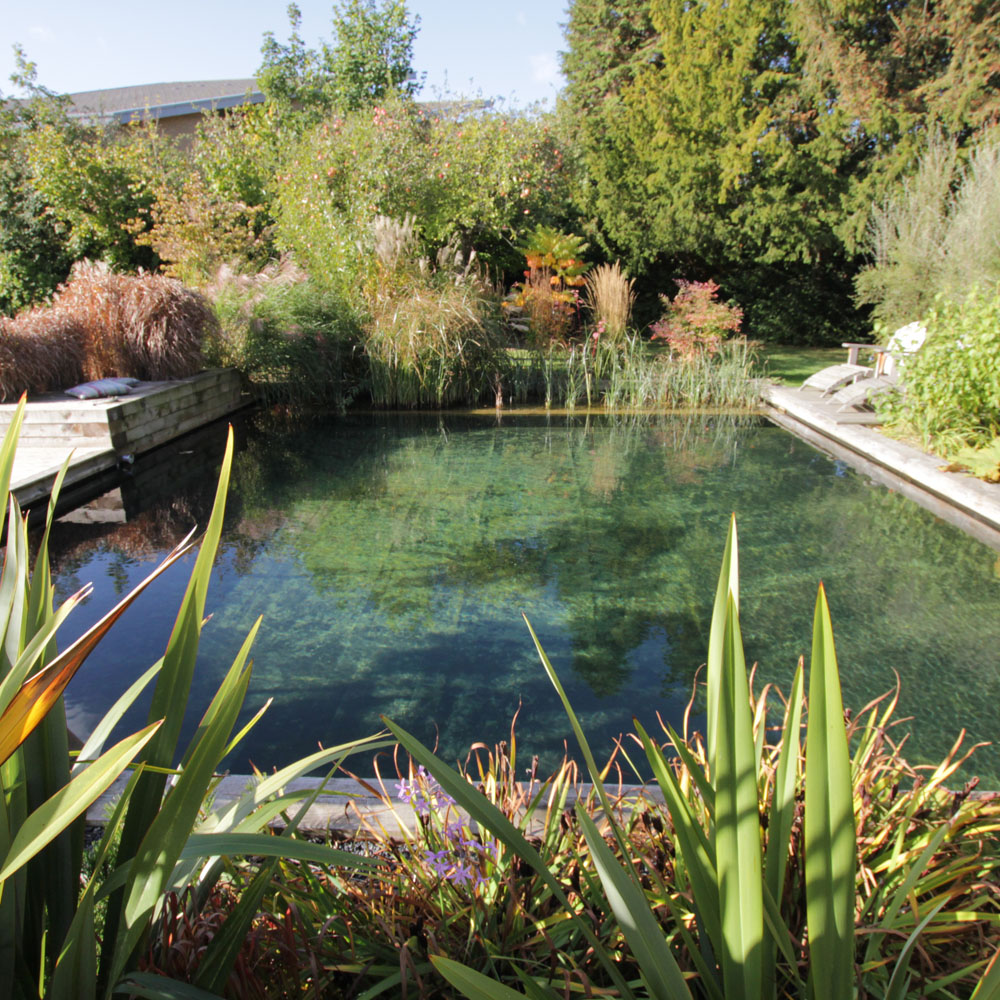
Natural swimming pools use plants or a combination of plants and sand filters to keep the water clean and clear without chemicals. They can be designed in a multitude of ways: Some look like natural ponds; others may be disguised as standard tiled pools.
Constructing Natural Swimming Pools
Natural swimming pools can utilise gravel, stone, clay or even concrete as their shell, and rely on the presence of aquatic plants rather than harmful chemicals and complex mechanical filtering systems. These plants contribute to the pool’s ecosystem by enriching it with oxygen, facilitating the growth of beneficial bacteria that eliminate debris and potentially harmful organisms, and providing a habitat for various water-dwelling creatures such as frogs and dragonflies.
The outcome is a visually stunning and ecologically diverse system that is surprisingly affordable to construct. Inspiration for this can be seen in the natural swimming pools like that of Sophie Kovic. In fact, if you choose to embark on a DIY project, you can build a natural pool for as little as a few thousand dollars, whereas conventional pools can cost tens or even hundreds of thousands of dollars.
Natural swimming pools require no harmful chemicals, operate on a relatively low-tech basis, and once established, demand only modest maintenance. You will no longer need to drain the pool at the end of each autumn season, as the pool will only need occasional refilling.
Crafting Natural Swimming Pools by Hand
The most economical and environmentally sound approach to building natural swimming pools is to excavate a hole in the ground. The depth and dimensions of the pool can be customized to your preferences, but it’s crucial to ensure that the sides slope to prevent soil collapse. For optimal stability, maintain a ratio of 1-foot vertical drop for every 3 horizontal feet.
Zoning Natural Swimming Pools
To eliminate the requirement for chlorine, expensive filters, and pumps, allocate at least 50 percent of your pool’s surface area to shallow plants, either in one section or arranged in a ring around the sides. It’s important to separate the swimming area from the filtration area or plant zone. A rim positioned just below the water’s surface keeps the plants contained while allowing water to flow from the swimming area into the plant zone for natural filtration.
As water passes through the fibrous root structure of the plants, bacteria attached to the roots act as a biological filter, removing impurities and excess nutrients. Decomposer organisms present in the plant root zones consume the bacteria, effectively preventing the buildup of underwater waste.
Within the plant zone, the water depth should gradually increase, reaching a maximum of 18 inches near the swimming area. The outermost 6 inches of the plant zone should be 2 to 3 inches deep, providing space for taller aquatic plants, while the deeper region accommodates submergent and floating vegetation.
Apart from ensuring water clarity and cleanliness, the shallow plant zone facilitates rapid water heating and serves as a breeding ground for frogs and various invertebrates that help control mosquito populations.
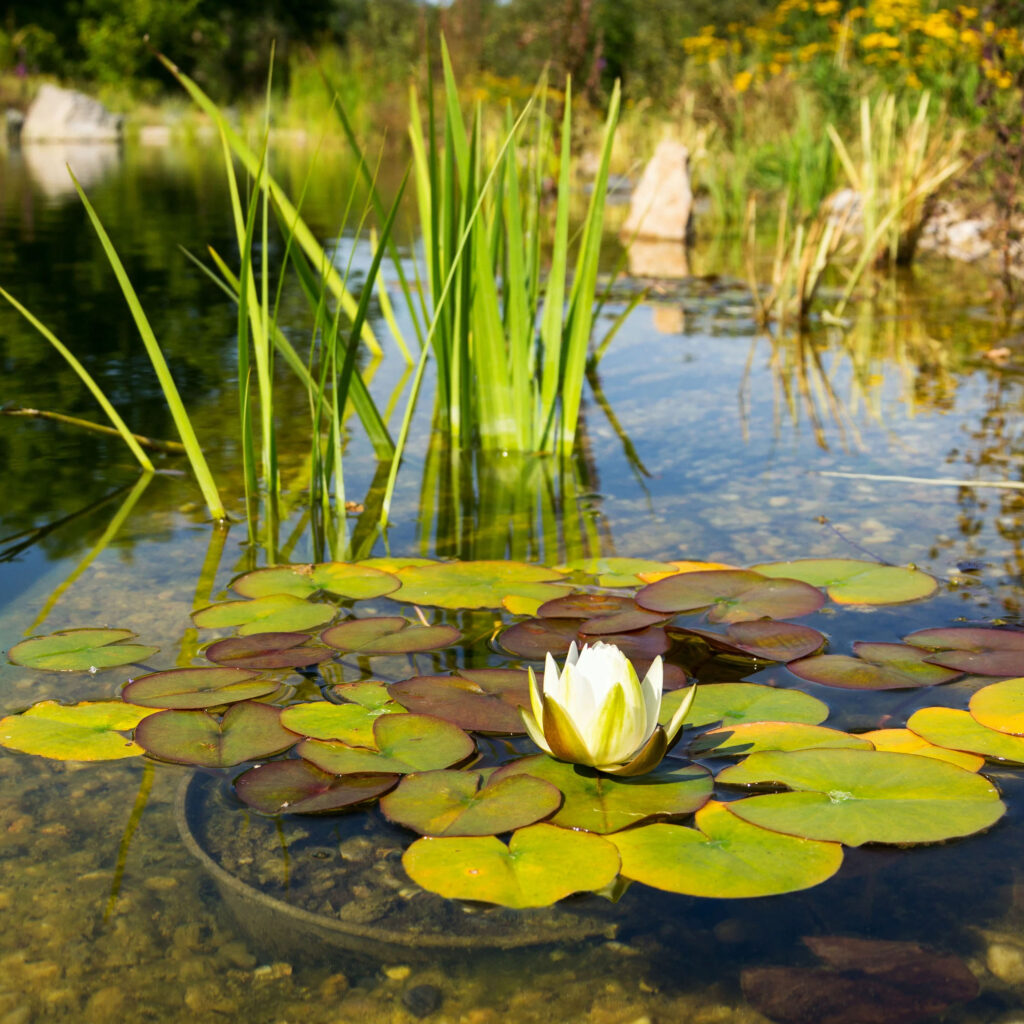
Rushes, sedges, and water lilies not only create an aesthetically pleasing border around your natural swimming pool but also contribute to water clarity and purity.
Natural Pool Filtration
In order to maintain a clean pool, it is essential for the water to circulate continuously and for the plants’ roots to cleanse the pool. Adequate oxygen supply is also crucial for the water organisms to thrive. Insufficient oxygen levels can lead to stagnant water, which can foster the growth of odoriferous anaerobic bacteria.
To channel water from the pump to the plant zone, PVC tubes can be used. In colder climates, it is recommended to use flexible PVC. Regardless of the climate, burying the tubing about 18 inches deep in the soil is advisable. Underwater aeration is a more energy-efficient method than constructed waterfalls and it effectively circulates the water. This method involves diffusing air at the bottom of the pool.
An aerator can be constructed using a small air compressor and high-strength tubing that connects to a diffuser. The diffuser, which releases air bubbles into the water, should be placed in the deepest part of the pool to prevent damage. A brass manifold can be connected to the compressor to regulate the air pumped into the pool.
Aerating Natural Swimming Pools
It is recommended to aerate the pool for four to eight hours a day, with a focus on the morning and evening when oxygen demand is highest. To protect the equipment from debris, the aerator, pump, and skimmer can be placed in a plastic container, such as a bucket or large plant container, with a steel-mesh filter mat covering the top. An underwater aeration system of good quality typically costs between $1,000 and $1,200.
Some pool owners use skimmers with an additional small pump to remove floating debris. Although not essential, this can be beneficial if there are nearby trees or shrubs that shed leaves or seeds into the pool. The skimmer prevents detritus from sinking and contributing to algae growth.
Installing pumps and compressors near or in water can be challenging and requires precautions. It is important to connect the electrical hardware to the home power supply using a buried conduit, rather than relying on extension cords. To ensure the safety of the system, it is recommended to hire a skilled electrician.
Natural pools provide a habitat for various organisms such as frogs, water striders, and dragonflies, making them an exciting environment for exploration, especially for children.
Sealing Natural Swimming Pools
Once you have excavated the hole for your natural swimming pools and the plant zone, you have a couple of options to ensure the pool retains water, depending on your soil conditions. You can choose to apply a layer of bentonite clay to seal the soil or use a synthetic liner. Bentonite clay is generally the more cost-effective choice, with an average price of 35 cents per square foot. Liners, on the other hand, can range from 25 cents to $1 per square foot, depending on their composition and weight.
Using Bentonite Clay in Natural Swimming Pools
Bentonite clay acts as a binding agent, forming a bond with the soil particles and preventing water from seeping into the ground. In some cases, the soil may contain enough clay that compacting the pond bottom alone will be sufficient to hold the water. It is advisable to consult local pond builders to determine the suitability of your soil. However, it’s important to note that bentonite clay does not bond well with sandy soil. In sandy soil conditions, you may need up to 12 pounds of bentonite per square foot, compared to 6 pounds in clay-rich soil.
Additionally, if the surrounding soil is very dry, applying bentonite directly to the soil may pose challenges. In arid climates, it is recommended to apply bentonite beneath a woven or textured plastic liner to prevent shifting. In more humid climates, bentonite can be applied directly to the soil. Before treating the pool with bentonite or any other clay powder, ensure thorough soil compaction. This can be achieved using a lawn roller or plate compactor. After compaction, spread a layer of 2 to 3 inches of bentonite powder along the pool sides and bottom, while wearing a mask. Use a tractor or plate compactor to pack it down, and then apply another foot of high-quality topsoil and compact again.
Using a Liner in Natural Swimming Pools
If you opt for a liner, it is advisable to select one made of ethylene propylene diene monomer (EPDM) rather than PVC. Although EPDM is twice as expensive as PVC, it offers additional benefits that make it worth the extra cost. EPDM provides protection against ultraviolet rays and remains flexible even in cold weather conditions.
If your soil contains many rocks or roots, it is recommended to choose a 45- or 60-millimeter liner. For very sandy and smooth soil, a 30-millimeter liner can be used, provided there is minimal risk of tearing. Before laying the liner, compact the sod and cover it with a layer of sand or an absorbent material such as old carpeting or newspaper. Newspaper can be particularly effective as it bonds to the liner when wet, providing extra protection in case of small holes.
Once the bentonite clay or liner is installed, it is important to cover the bottom of the pool with 4 to 5 inches of gravel. This gravel layer creates a habitat for beneficial bacteria that aid in the biodegradation of leaves and other organic matter that may sink to the bottom of the pool. Ensure that the gravel used is clean.
Testing Cleanliness
To test the cleanliness, fill a 5-gallon bucket with a spigot with some of the gravel you intend to use and run water through it. If the water appears dirty, the gravel needs to be cleaned or an alternative source should be sought. Expanded shell aggregates and other manufactured gravels are typically clean enough to be used in a natural pool. In addition to lining the pool with gravel, many individuals choose to construct cobblestone steps for easy access in and out of the pool. A cantilevered dock built over the water can also serve as a convenient entry point and provide protection for the pool’s sides.
To complete the perimeter of your pool, use a plate compactor to ensure a compact and stable surface. Although this helps prevent soil erosion, it’s not a foolproof method to keep dirt out of your pool. There are alternative options available to edge the perimeter, such as rocks, flagstone, or wood planking. A more effective approach is to plant vegetation right next to the edge, allowing the plants to stabilize the perimeter.
Martin Mosko, a principal architect at Marpa and Associates, a landscaping company in Boulder, Colorado, suggests using plants as they not only anchor the soil but also create a natural atmosphere resembling an old-fashioned swimming hole. If you choose to use plants instead of stones, select those that thrive in wet soil or ensure that the water level remains at least one foot below the pool’s edge to prevent waterlogging of the perimeter plants.
Concrete Natural Pool Options
For those interested in a more traditional pool shape, consider constructing it with cement or Rastra block like that of Sophie Kovic, or even prefabricated concrete water tanks. While these options are not as environmentally friendly as gravel and stone, they can still reduce chemical and energy consumption by utilising plant-based filtration systems instead of mechanical filters and chlorine for water clarification.
Building a Concrete Natural Swimming Pool
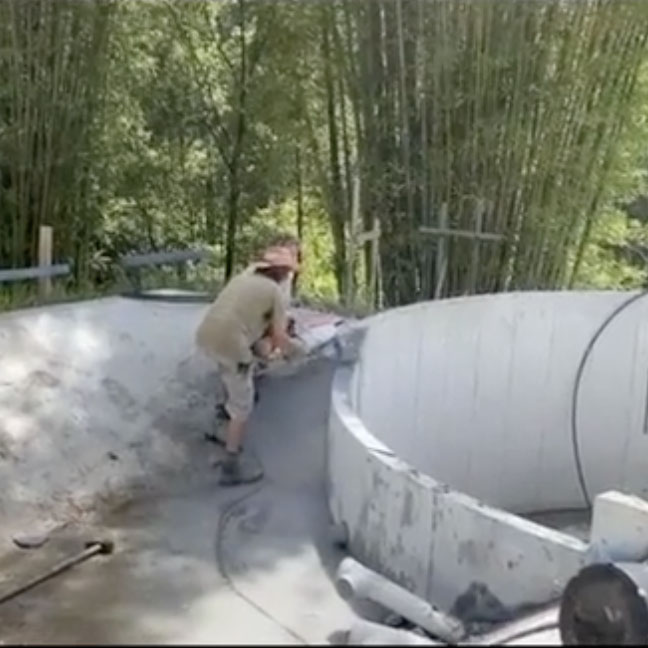
A 100,000 litre concrete water tank provides relatively inexpensive, fast and easy option. You will need to dig the tank into the ground (This will require the fitting of a hydrostatic valve), and then cut out a section of the wall to allow water to flow into the filtration zone. The filtration zone will then have to be poured in reinforced concrete and sealed to the pool edge.
Pouring a concrete pool requires precision, as the right mix and density are crucial to prevent cracking. Due to the complexities involved in concrete pouring, we advises against do-it-yourself construction.
For those experienced in concrete work, here are some tips: Use a mix ratio of 4 parts portland cement to 1 part sand, and cover the compacted soil with fiber mesh, a rubber liner, old carpeting, or newspaper to provide a stable surface for the concrete. After pouring the concrete, apply a 1/8-inch coat of stucco to waterproof the pool since concrete is porous.
Alternatively, Rastra block can be used as a substitute for concrete. These blocks, made of recycled polystyrene and cement, are lighter than concrete and can be easily set in place. Kenton Knowles of Global Homes in Baldwin City, Kansas, built a Rastra-block pool measuring 16×32 feet for approximately $1,600 in materials.
To construct a Rastra-block pool, excavate a hole slightly larger than the pool’s dimensions to allow for ample workspace. Most people opt for a pool depth of 5 feet. For the bottom, either pour a concrete slab or use a rubber liner. Line the bottom with gravel and install a drain and backflow preventer.
Using Rasta Blocks
Secure one section of Rastra block along the slab’s edges with rebar. Fill the Rastra blocks’ cavities with concrete to connect the structure. Use an expanding foam sealant between courses and at joints to hold the blocks in place. Waterproof the blocks by applying two coats of stucco. Backfill the space between the sides of the pool and the Rastra block with soil. The perimeter can be finished with stones extending from the top of the blocks or by planting vegetation at the edge.
To create a conventional pool with vertical sides, you can use Rasta blocks made of cement and recycled polystyrene. Establish plant beds around the pool’s perimeter to naturally filter and clean the water.
Once your pool is built, it’s essential to prepare the plant zone with 3 to 6 inches of soil. Carefully select the soil to avoid contaminants and ensure it’s free of organic matter that would decompose underwater. Consider having soil samples tested for potentially harmful bacteria by contacting your state’s health department or a local laboratory. Once the soil, gravel, and necessary hardware are in place, you can proceed to fill the pool. Minimize soil disturbance and allow the pool to settle for a week before planting. During this time, test the hardware to ensure proper functioning.
Selecting plants
For your pool area, choose varieties that are suitable for your climate. Native-plant suppliers, local sources found online or in the phone book, and home and garden centers are good places to acquire aquatic plants. You can also explore mail-order nurseries specializing in water-garden plants. Sedges (Carex), rushes (Scirpus), and other aquatic plants are excellent choices for the pool’s perimeter. In shallower areas, consider plants like pickerel weed (Pontederia cordata), arrowhead (Sagittaria), and water primroses (Ludwigia).
Using Submerged Plants
Include submergent plants like common waterweed (Elodea) and hornwort (Ceratophyllum) for their oxygen-producing properties. For water 6 to 18 inches deep, plant a mix of floating, submergent, and emergent plants.
Water lilies (Nymphaea) are versatile and adaptable to any depth, making them a great addition. Floaters like pondweeds (Potamogeton) and common duckweed (Lemna minor) can freely drift on the water’s surface and provide coverage.
Once you have obtained your plants, it’s time to plant them in the filled pool. Group the plants according to their height and type, following a predetermined plan. Anchor the plants securely in the soil and provide sufficient gravel for stability.
Before collecting plants from the wild, familiarize yourself with the laws protecting wetlands and their plant life. If collecting plants, ensure you only take a few samples from larger populations to preserve the health of the wetland. It’s also worth considering rescuing plants from threatened sites, such as construction areas, with permission from the respective authorities.
Dealing With Algae
Controlling algae in your natural pool is an ongoing concern. Algae compete with plants for nutrients and light, but their growth tends to decline when water lilies and other plants emerge and provide shade. Promote plant growth and deter algae by adding more plants and reducing phosphorus levels to maintain a lower pH (5.5 to 6.5). Monitoring the pool for phosphorus and avoiding nutrient-rich runoff is crucial, as fertilizers and urine are major sources of this nutrient. Increasing aeration can also stimulate biological activity.
Various additives such as enzymes, bacteria, and acids have been marketed as solutions to combat persistent algae. However, introducing these chemicals to your pool may not necessarily improve its overall balance. It’s important to remember that your pool is a living ecosystem, and synthetic chemicals may disrupt its natural equilibrium.
Leaf Litter
To ensure the long life of your natural pool, remove plant litter in spring and fall. Maintain a consistent water level and be prepared to add water when needed. Test kits available at garden centers can help monitor nutrient levels and alert you to potential issues. Additionally, perform annual checks on the pool’s mechanical systems, including wiping diffusers with vinegar to remove deposits, inspecting air hoses for cracks and obstructions, and examining pump connections. By taking these precautions, your pool will provide you with enjoyment for years to come.
While it’s true that aquatic plants do not eliminate all contaminants from the water, the likelihood of contracting serious diseases from natural swimming pools is generally low. Even chlorine-treated pools can be susceptible to fecal coliform contamination, which can cause health problems. To avoid such issues, keep babies and pets out of the water to prevent fecal contamination. If you have concerns about your natural pool’s water quality, consider having it tested.
Caring for Your Natural Swimming Pool
In contrast to a conventional pool that relies on regular chlorine treatments, which can be expensive and require frequent water testing and vacuuming, a Natural Swimming Pool/Pond employs a built-in biological filtration system to handle most of the work!
Initially, natural swimming pools demand more maintenance as you establish and nurture the ecosystem, but over time, the maintenance decreases as the system matures. Think of it as tending to a garden: you prepare the soil, sow the seeds, and patiently wait for the plants to grow, supporting them with proper watering and sunlight. Once the plants are well-established and the garden thrives, occasional pruning may be all that’s needed. Growing a natural swimming pool follows a similar pattern!
At the Start
When activating Natural Swimming Pools for the first time, the plumbing system immediately springs into action, causing the water to circulate through the biological filter and rise to the surface to obtain oxygen. During startup, we introduce beneficial bacteria to the biological filter (using a double dose), and a small amount of pond dye is added to the water to hinder string algae from overpowering the new bacterial colony. Typically, another dose of beneficial bacteria is added during the first swimming season and at the beginning of the second summer.
Regular Maintenance
Unlike traditional pools with their white bottoms, Natural Swimming Pools don’t consider a leaf or a bit of natural debris as unsightly, meaning there is no need for frequent vacuuming or skimming. Most Natural Swimming Pool/Ponds, like their conventional counterparts, come equipped with a mechanical skimmer that effectively removes leaves and debris from the water surface. The net inside the skimmer will require occasional emptying when it becomes full.
About Once a Year
The majority of Natural Swimming Pools are designed to operate throughout the year, often at a lower, more energy-efficient speed during the winter, without the need for covering or draining! During the non-swimming months, you can enjoy your NSP just like any natural pond As time goes by, a healthy Natural Swimming Pool will develop a bio-film or “living patina” on underwater surfaces.
To manage this bio-film, we recommend an annual Spring Cleaning, which involves removing debris that has settled at the bottom and using a pond vacuum to clean the surface of the planted filter area. During this Spring Cleaning, it’s advisable to adjust your variable speed pumps back to the summer setting, introduce more beneficial bacteria to the biological filter, and consider adding pond dye to prevent string algae issues as the water temperature rises once again.